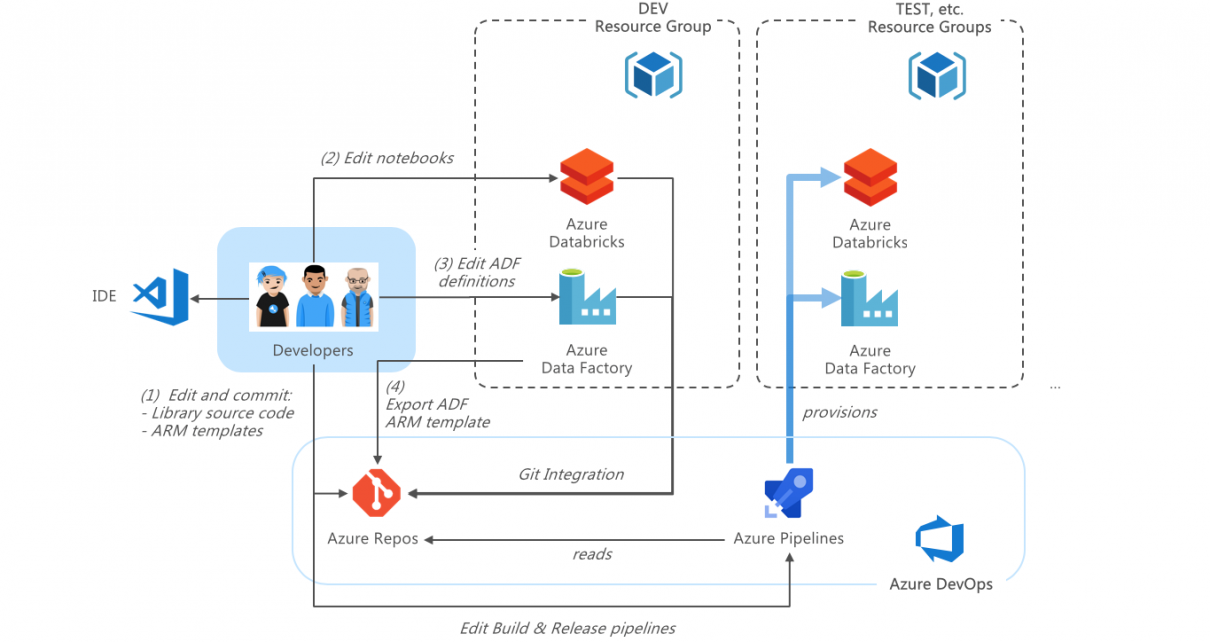
This is Part 2 of our series on Azure DevOps with Databricks. Read Part 1 first for an introduction and walkthrough of DevOps in Azure with Databricks and Data Factory.
Table of Contents
Setting up the environment
To get started, you will need a Pay-as-you-Go or Enterprise Azure subscription. A free trial subscription will not allow you to create Databricks clusters.
Create an Azure Databricks workspace. Select a name and region of your choice. Select the standard tier.
Navigate to the Azure Databricks workspace. Generate a token and save it securely somewhere.
Navigate to and log in with your Azure AD credentials. Create a new Organization when prompted, or select an existing Organization if you’re already part of one.
Navigate to the Organization Settings > Azure Active Directory and ensure your organization is connected to a directory. Otherwise, connect it to the directory linked to the Azure subscription in which you will be deploying the resources. We will need that connection to allow Azure Data Factory to synchronize to Git.
Create a new Project. Name the project devopstutorial.
Navigate to Repos > Files, click the Import button and enter https://github.com/algattik/databricks-devops-tutorial. Note: you can also skip this step and fork the repository on GitHub instead. In that case, use your GitHub repository instead of Azure Repos in the subsequent steps.
Creating a Build Pipeline
Navigate to Pipelines > Builds, click New Pipeline, select Azure Repos Git and select your repository. The build pipeline definition file from source control (azure-pipelines.yml) opens. It contains a Maven task to build our Java library, and tasks to archive and publish the result of the build as well as artifacts and scripts needed by the release pipeline.
Click Run to execute the build pipeline. Wait until the build runs to successful completion.
Creating a Release Pipeline
We will import our Release Pipeline definition file from source control. Because of a quirk in the UI, it is only possible to import a pipeline if a pipeline already exists, so we will create an empty pipeline first. Navigate to Pipelines > Releases, click New Pipeline, select Empty Job (at the top). Click Save and then OK. Now, click All Pipelines, New, Import Release Pipeline. Download the Release Pipeline definition file and upload it.
As the pipeline definition was imported from a different project, the references to the build pipelines are invalid. Select the artifact and click Delete and confirm the deletion.
Now click Add an artifact and recreate the artifact with the reference to your build pipeline.
We now need to fix our deployment stages. Under Tasks, select the DEV stage. Select the Agent job select Hosted Ubuntu 1604 as the agent pool.
Select each task and connect your Azure subscription.
Do the same for the TEST stage.
Navigate to the Variables tab. Update variables as follows:
- Update DATABRICKS_HOST to the host (URL base) of your Azure Databricks workspace.
- Update DATABRICKS_TOKEN to the Databricks token you generated previously.
- Update LOCATION to the location you want to deploy your resources to.
- In the other variables, update the substring databrickscicdtut01 to a unique string containing only lowercase alphanumeric characters. This string must be globally unique to you, to avoid deployment conflicts.
Click Save, then OK.
Under Release in the top right corner, select Create a release, then click Create. Click on the TEST stage to change the TEST trigger to manual. This will allow us to update the Data Factory definitions in DEV, before we deploy to TEST.
Making updates in DEV
Updates in Databricks Notebooks
The release pipeline will upload the notebooks into a devops-deployed folder in the root of your Databricks workspace.
Do not edit the notebooks directly in this folder, as they will be overwritten upon the next run of the release pipeline.
Copy the notebooks to a directory within your user folder. Open the Notebook Revisions pane and enter the details of your Git repository. As notebook path, enter the notebook path as in the repository. If using GitHub instead of Azure DevOps, refer to this page.
As you make changes to notebooks, you can commit them directly using Save Now in the History panel.
Updates in Data Factory
In the Azure Portal, navigate to the resource group that was deployed by the DEV stage of the release pipeline. You will see three resources.
Navigate to the Data Factory, and click Author and Monitor. Click the Setup Code Repository button and enter the details of your Git repository (Azure Repos or GitHub). Under Git repository name, select Use Existing. As Root folder, enter /datafactory. Click Save.
Navigate to the Author pane.
You will be prompted to select a working branch. Select master
Edit the Azure Databricks connection by clicking on the Edit (pencil) icon next to the AzureDatabricks linked service.
Update the Domain/Region field to match the region of your Azure Databricks workspace. Click Test Connection, then Finish.
Azure Data Factory will automatically synchronize your changes into version control.
In the Azure Data Factory toolbar, select ARM Template > Export ARM Template. This will download a ZIP file with your pipeline definitions.
Open your project again in Azure Devops. Navigate to Repos > Files and browse to the arm-templates/generated-data-factory folder in your solution. The folder already contains an arm_template.zip file. Click Upload file, and overwrite the file with the one you just downloaded from Data Factory.
Navigate to Pipelines > Builds. You should see that a build was automatically triggered. Otherwise, click Queue to trigger a build.
Wait for the build to complete successfully.
Navigate to Pipelines > Releases and click Create a release and OK. This time we will let deployment to both DEV and TEST be performed automatically. The deployment to DEV will have no effect since the environment is already provisioned. The deployment to TEST will deploy the environment and validate the setup with an integration test.
After the pipeline completes successfully, open Azure Storage Explorer and navigate to your storage account corresponding to the TEST environment. Verify that a JSON file was created containing prediction scores.
Conclusion
This tutorial provided an overview on ways to perform CI/CD with data projects. As an exercise, you should now modify aspects of the project in DEV, and then run the pipelines again to verify their effect in TEST.
You can study the release scripts in the sample project to understand in more details how CI/CD is performed.