Writing data back from Power BI traditionally involves PowerApps integration, which comes with certain limitations, especially when fast feedback is desired in the UI layer. The Power BI JavaScript API, combined with DirectQuery, allows easily implementing powerful MVC scenarios, such as creating a business transaction from an embedded Power BI report and instantly visualizing the result.
In this introductory tutorial, we only scratch the surface of what’s possible. In a follow-up (coming soon), we will demonstrate complex scenarios including rendering user-specific data.
Table of Contents
Sample application
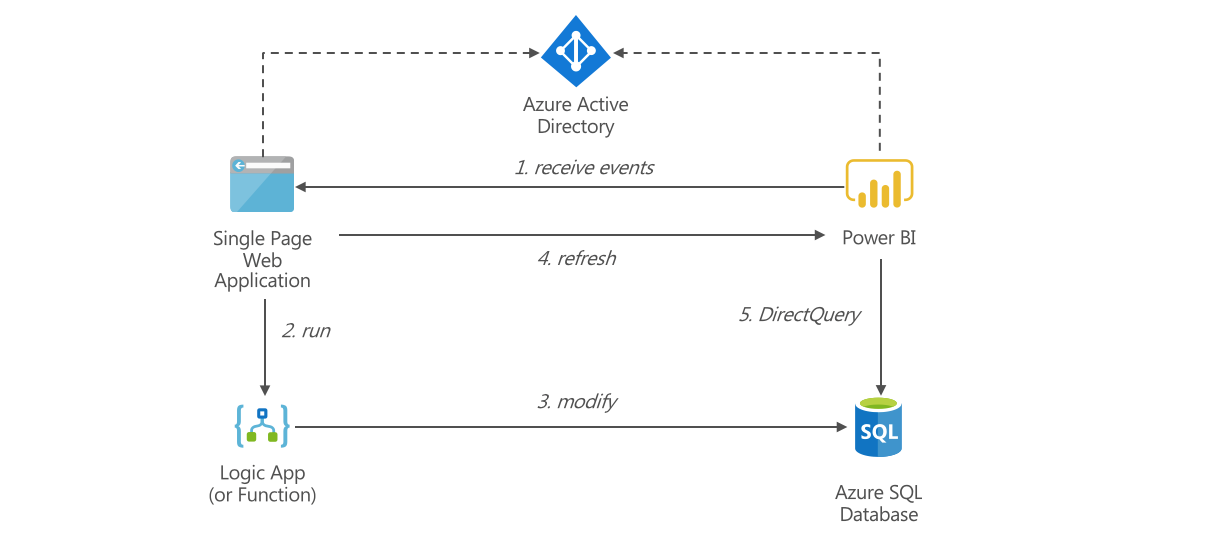
The demo project includes a sample Power BI report that displays data from the well-known AdventureWorks example database, deployed in an Azure SQL Database. A JavaScript project embeds the report. An HTML button allows calling a Logic App that writes new items into the backend Azure SQL Database. After the Logic App execution has completed, the JavaScript application refreshes the report. As the report connects with DirectQuery, the newly written data is immediately reflected in the report.
Walkthrough
Prerequisites
You will need the following software:
- Python
- npm (distributed as part of node.js)
- Power BI Desktop
Clone the tutorial project from GitHub: https://github.com/algattik/powerbi-transactional-tutorial.
Azure SQL Database
In the Azure Portal, deploy a new Azure SQL Database. As database name, enter advworks. Choose a unique server name and choose a login and password. Leave all settings default.
Click Next: Additional Settings, and click Sample. This will load the AdventureWorksLT sample data into the database. Click Review+Create, then Create.
After deployment completes, access your database in the Azure Portal. Open the Query editor pane and connect using the database credentials you just defined. Paste the content of the file assets/salesorders-extensions.sql and
click Run.
Power BI Report
Open assets/salesorders.pbit in Power BI Desktop. You are asked to enter the database name and server name of the database you just created.
When prompted for credentials, select Database, enter the database admin credentials and click Connect.
The report is populated with data from the database.
Select Publish, save the report to a new file when prompted. Select My workspace as destination. Ignore any messages about a missing enterprise gateway. Click the Link Open … in Power BI.
Once logged into the Power BI website, in My Workspace, navigate to Datasets, locate your dataset, click on “…” and click Settings.
Click Edit credentials. As Authentication method, select Basic. Enter the database credentials you set up earlier, and click Sign in.
Navigate back to My Workspace, click Reports and click on your report.
In the report, click File > Embed.
Copy the report link into the EMBED_URL constant in scripts/settings.js file of the cloned repository.
Client ID
Navigate to https://dev.powerbi.com/apps. Sign in and click Register.
Enter any application name. As Home Page URL and Redirect URL, enter http://localhost:8080 .
In the API access section, check Read all reports.
Copy the Application ID
Copy the Application ID into the CLIENT_ID constant in scripts/settings.js file of the cloned repository. You won’t need the Application secret.
То enable the client-side application to log in, an extra step is required. In the Azure Portal, navigate to Azure Active Directory > App Registrations. Set the filter to All Apps, locate the application you just created, open it and click Manifest. In the manifest, set oauth2AllowImplicitFlow to true and save.
Testing the report integration
We’re still missing the configuration of the Logic App, but let’s already test the report integration in the web page at this point.
Open a console into your cloned repository, and run npm install. This will install all JavaScript packges. Then run npm start to start a web server. Now point your browser to http://localhost:8080. (Do not use an IP address such as 127.0.0.1, as this will break Azure AD redirection).
Now verify that when you click a CustomerID or ProductID in the lower section of the report, the labels above the report update to reflect the selection.
Before we can actually create a Sales Order, we need to set up the backend integration component.
Logic App
In the Azure Portal, create a new Logic App. Select any name, resource group and locatio, and click Create.
In the Azure Portal, create a new Template Deployment (not a Logic App!). Select Build your own template in the editor.
Paste the content of the file assets/logicapp-templates.json into the textarea and click Save. Select a Resource Group and click Purchase to deploy the template.
After template deployment copletes, locate the resource AdventureWorksConnection within your resource group. Click Parameter value missing.
Fill in the connection information to the Azure SQL Database you deployed. You can leave Authentication Type and SQL Connection String blank. Click Save.
Locate the resource SalesOrderInsertLogicApp within your resource group. Open Logic app designer. Click on the first step to expand it. Copy the URL into the LOGIC_APP_ENDPOINT constant in scripts/settings.js file of the cloned repository.
Return your web browser to http://localhost:8080 and do a full refresh (Ctrl+F5) to ensure the browser picks up the modified settings script.
Click on a name in the left-side filter pane.
Click on a CustomerID and ProductID on the bottom pane. Click Create Sales Order. After a second or two the report is refreshed with the new Sales order.
Notice that your filters remain selected upon refresh. You will need to wait 15 seconds before you can create a new sales order, as the Power BI API doesn’t allow more frequent refreshes.
Conclusion
This was a simple overview of an end-to-end transactional application for an embedded Power BI report, using only a single page web application and a Logic App for integration. This simplistic setup demonstrates the use of the JavaScript library to coordinate a backend action and a report refresh.
The connection to the Logic App is not secure, since the token is included in the JavaScript file. For a production application, an Azure Function integrated with Azure AD should be used instead.